Lending books with Power Apps via custom pages

In my opinion, the new (model-driven) editor with command bar designer and custom pages support are the most interesting new features of model-driven Power Apps for a long time.
The significance of these new features is best demonstrated with an example, so let’s make a simple application with Power Apps to run a small library.
Let’s utilize a canvas app to provide a nice-looking start view and an easy lending/return experience. The model-driven application is used for data administration and browsing.
Let’s get started!
Tables for the lending process
The data model of the solution is simple. We have books (book), accompanied by authors (author) and 0-n bookings ( booking ).

Let’s create the tables in Dataverse in the normal way inside the solution package.

Book
For each book, the following information is saved
- Name (Name)
- Reference to Author (Author, LookUp)
- Release date (Publication Date)
- ISBN-code (ISBN)
- Unique Identifier (Id)
- Link to cover image (Image URL)
- Condition of the book (Condition)
- Is the book currently lent to someone (Currently Booked)
- Reference to latest booking (Last Booking, LookUp)

Author
Only the name of the author is saved.

Booking
For each booking, we save
- Lender’s name (Name)
- Date of the booking (Booking Date)
- Date of return (Returning Date)
- Reference to the lent book (Book)

Views and forms
We’ll customize the forms and views of each table in the usual way from the Power Apps Maker portal.

So far, everything has been done with the old, familiar tools.
Model-driven application
Next, let’s create a model-driven application to maintain books, bookings, and authors. When creating the app, we can choose which experience we want to use. Let’s select the new Modern app designer.

Let’s add the tables we just created to the app. This is done with the Add page function.

We are creating pages based on tables, so we choose the first option (Table based view and form).

Let’s select all the necessary tables.

We have now created a model-driven application. We can see the working application preview in the middle of the editor.

Formatting the navigation is easier than ever. Let’s change the tables to a more logical order in the navigation and name the title to be displayed as Library.

The new editor is quite logical and easy to use. Especially when compared to the old one.
So far, we have done nothing special. The end result is a basic model-driven application.

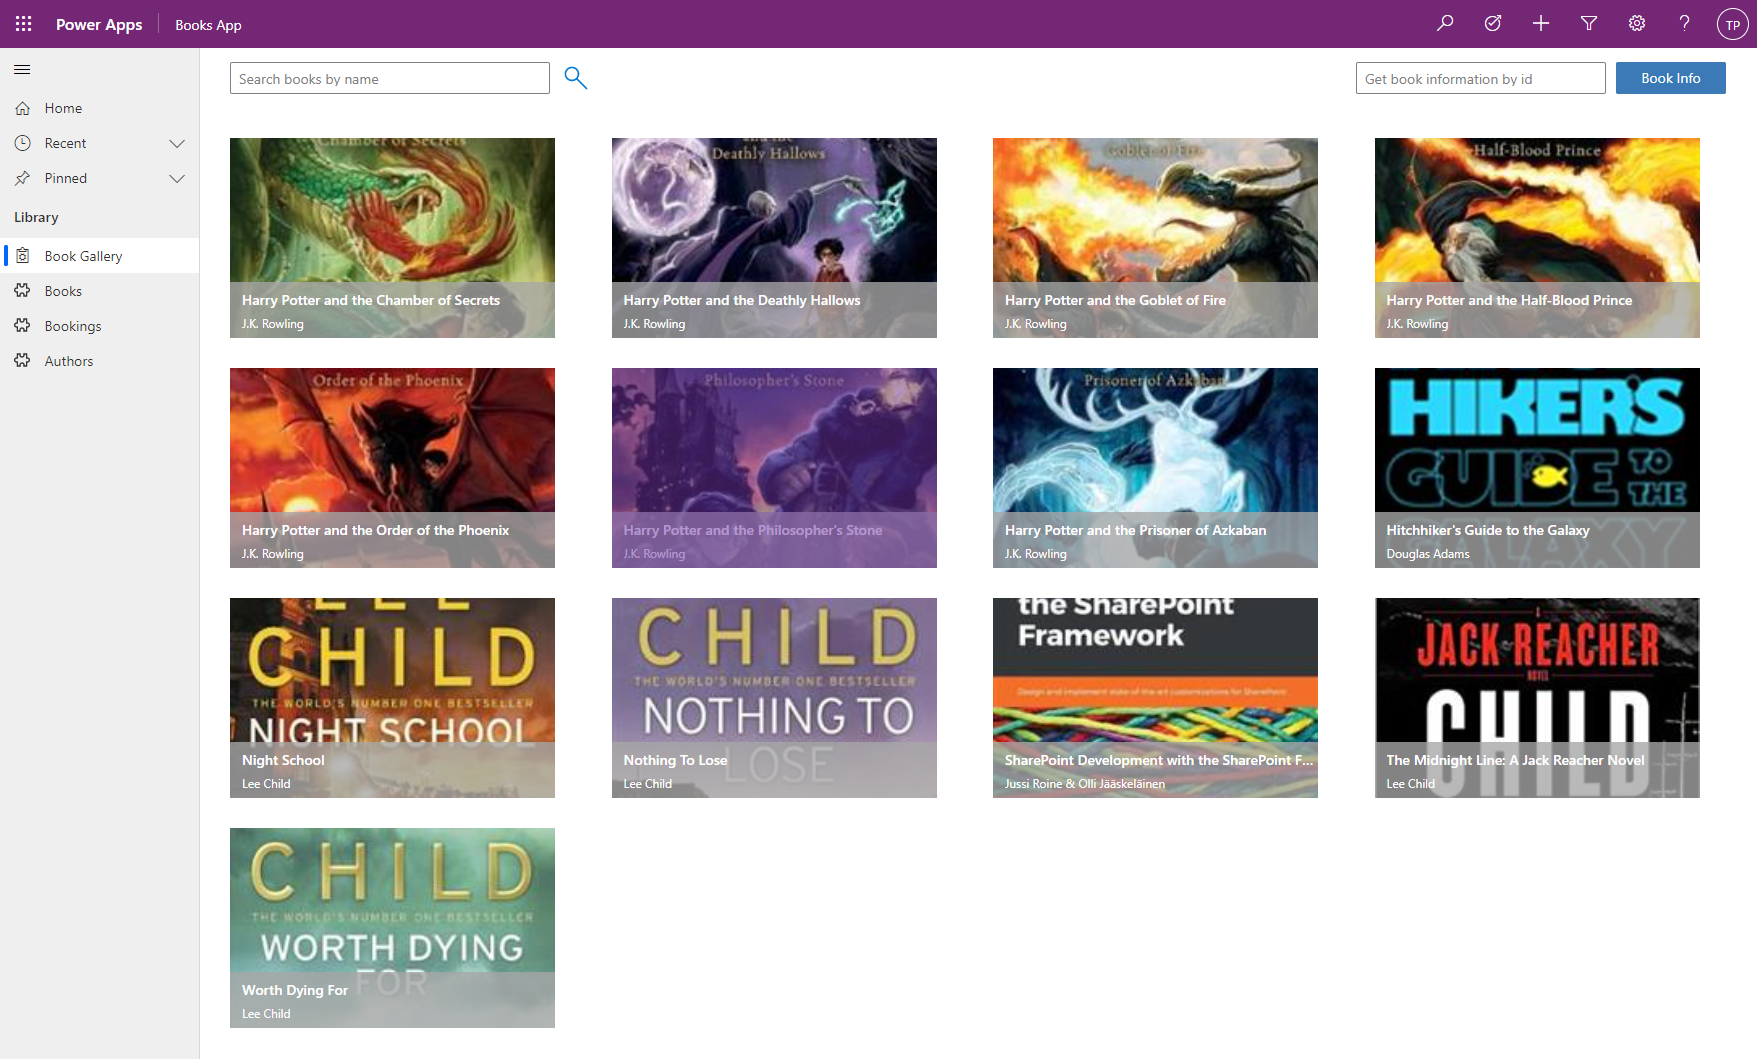
However, we want to create a visual gallery of the books as the main page in the model-driven app. This is where the customized pages come into play. Basically, we are trying to create a canvas application inside a model-driven application.
Let’s try.
Custom page
A new page is added to the application. Let’s select the type as Custom.

Let’s create a new page called Book Gallery.

The canvas editor opens with all the familiar features. Let’s create a gallery view of the books on the page and implement the following features:
- You can filter the gallery by book title
- The books on lend appear in purple in the gallery

In addition, books can be retrieved using their identifier (search box and button at the top right). If the found book is free, it can be marked as booked in the dialog that opens.

When you lend a book, a new row is created in the Bookings table. At the same time, the book is marked as “currently booked” and the most recent booking is added to the book’s Last Booking field.
UpdateContext(
 {
   varBooking: Patch(
      Bookings,
      varCurrentBook.'Last Booking',
      {
        Name: cmbUser.Selected.DisplayName,
        Book: varCurrentBook,
        'Booking date': Today()
      }
    )
 });

Patch(
  Books,
  varCurrentBook,
  {
    'Currently Booked': 'Currently Booked (Books)'.Yes,
    'Last Booking': varBooking
  });

UpdateContext({varShowDialog: false})
If the book is already booked, it can be marked as returned. In this case, the return date is added and the book is updated to “available”.

Both screens can be used to update information about the condition of the book (star rating from 1 to 5).
All of this is familiar to canvas makers. What is new is how you can now navigate between these two applications (canvas and model-driven).
Navigation from canvas to model-driven application
We do not want to implement a form to update basic information about the book in the canvas app. This already exists in the model-driven application. So, how do we move from the gallery to the edit form for the selected book?
Like this:
OnSelect = Navigate(ThisItem)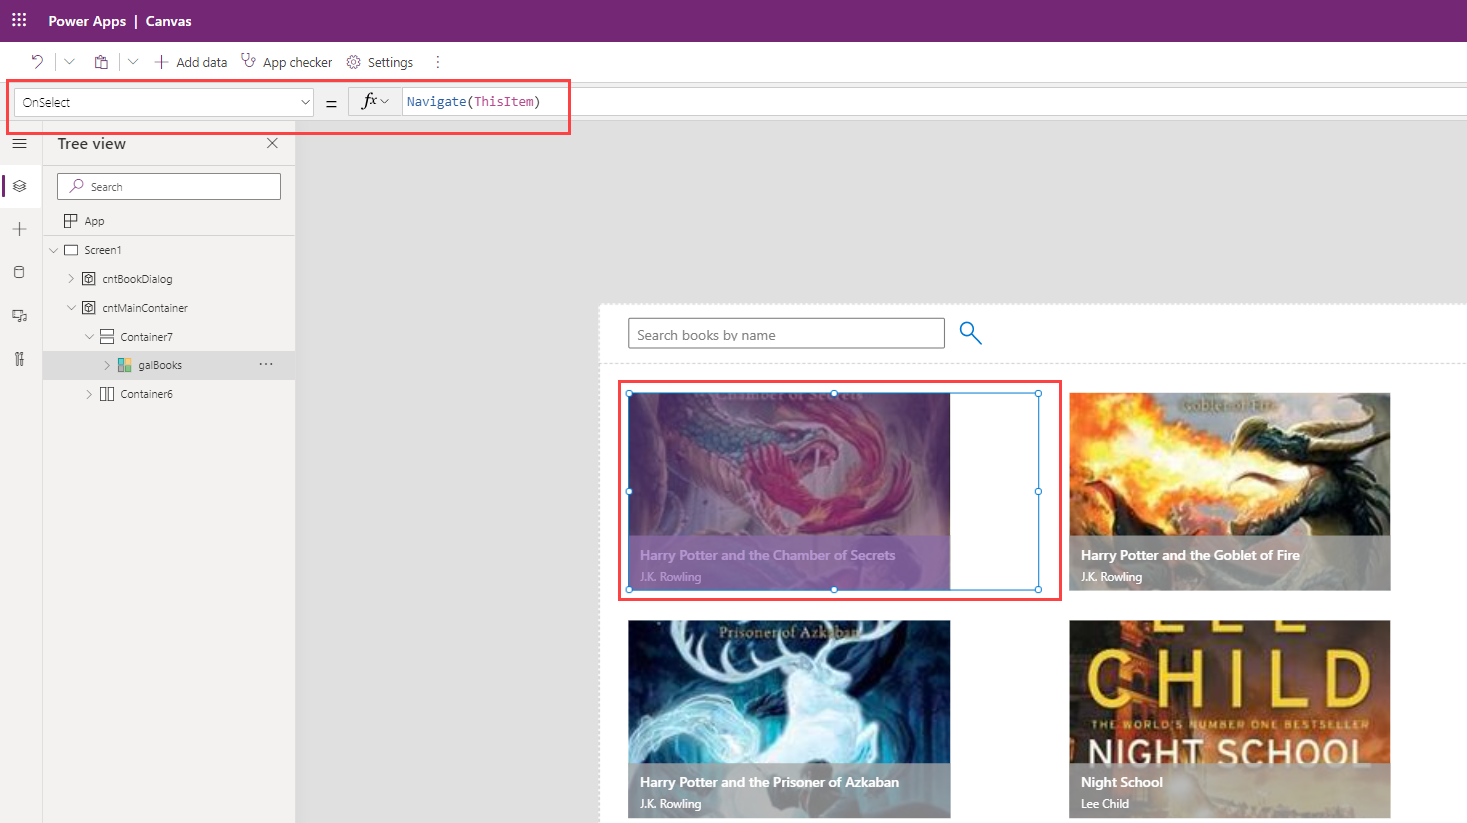
Nothing else is needed. Power Apps knows which table the gallery is connected to and can navigate to the correct form.
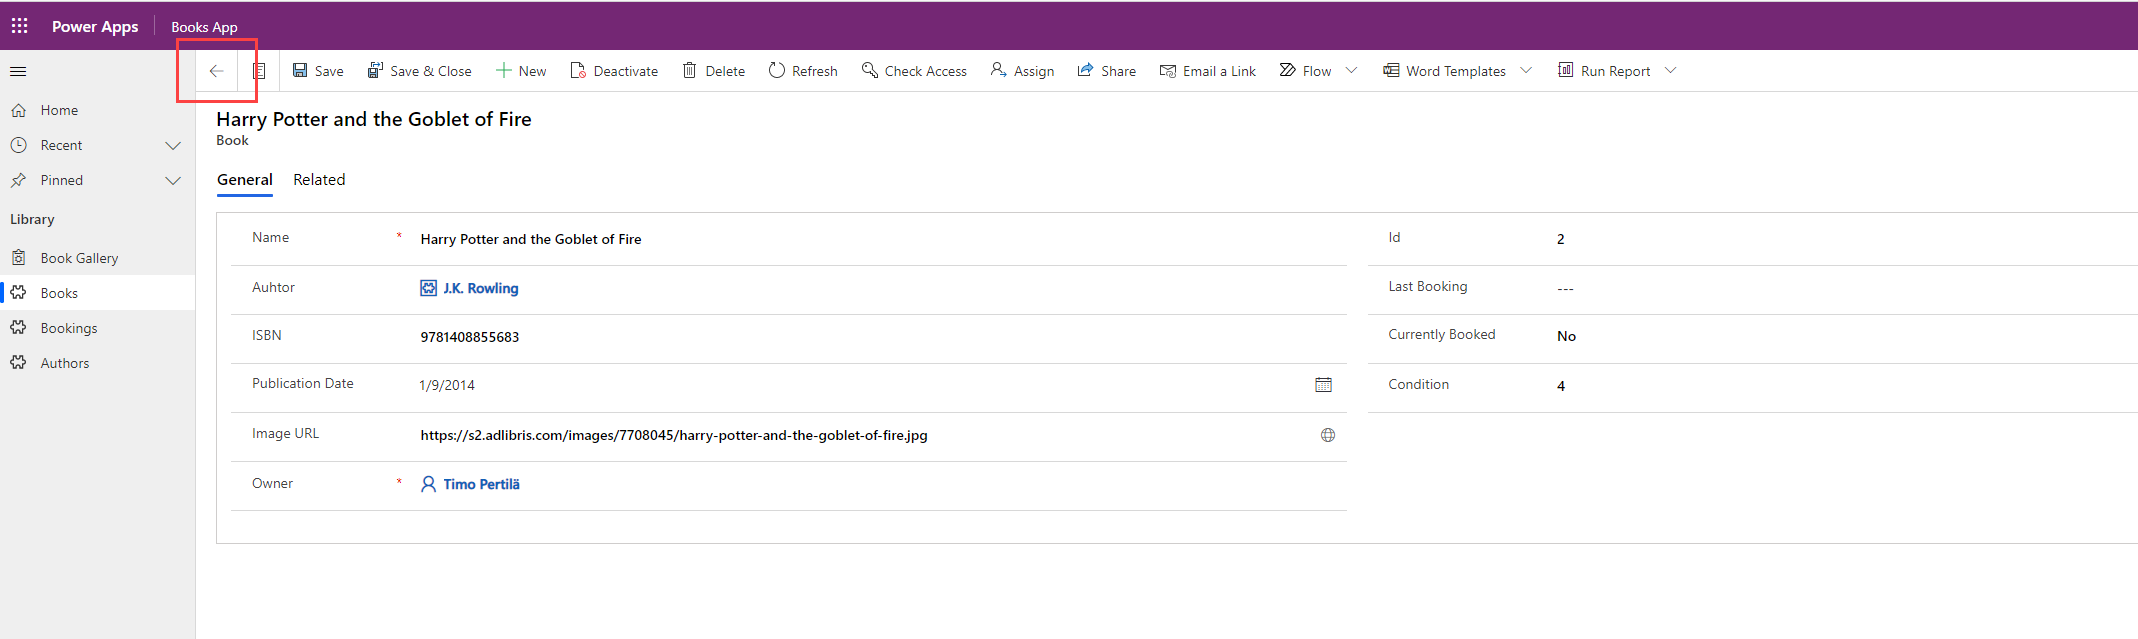
The back button on the form returns you to the canvas application (canvas always restarts in this case).
You can also navigate directly from the canvas to model-driven views:
OnSelect = Navigate('Authors (Views)'.'Active Authors')or a record creation form:
OnSelect = Navigate(Defaults(Authors))Saving and publishing
When the canvas app is ready, it will be saved.
And of course, published.
And so is the model-driven application…

This is how we create a model-driven application, whose starting page is a more elegant canvas page (custom page). Bookings and returns can be easily handled from the front page. Traditional pages are used to maintain basic information about the books and authors.
Edit the command bar
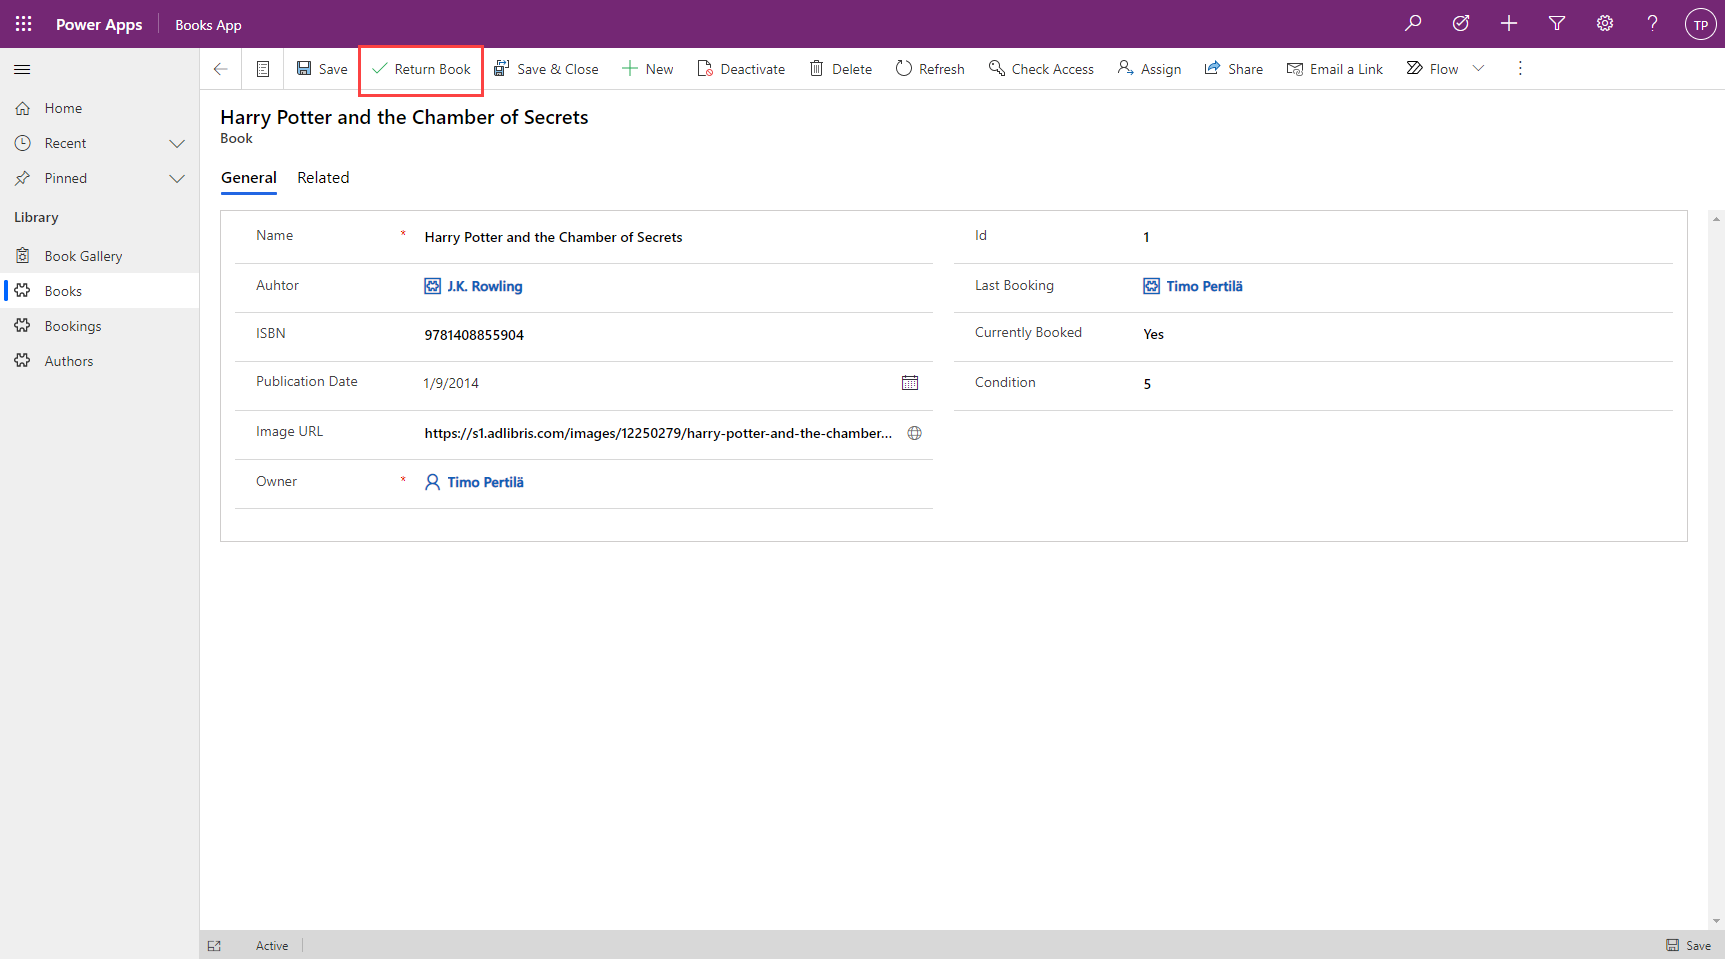
What if we offered the user the option to mark the book as returned from the model-driven form (picture below) as well?

Returning a book now requires updating both the information in a specific book and the details of the related booking. Sounds difficult.
However, the feature is easy to add with the new command bar editing functionality.
Let’s select the correct table (book) and the open Edit command bar from the three dots.
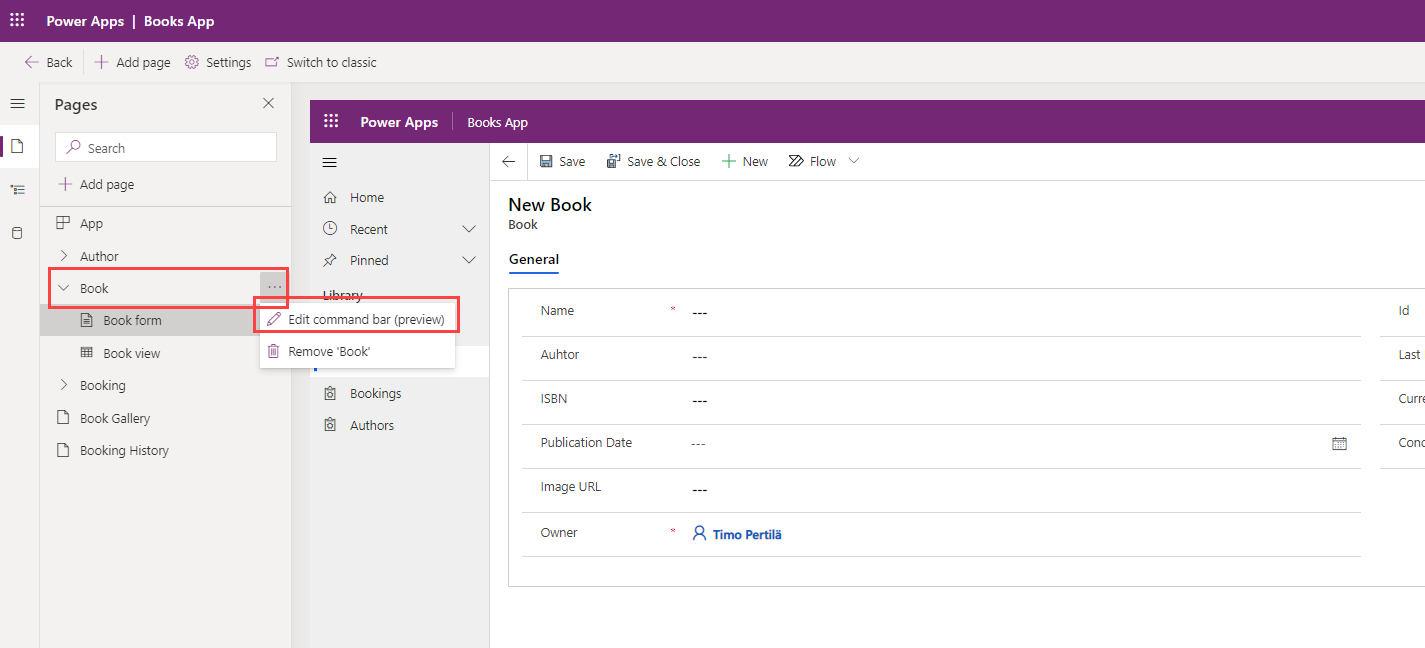
There are command bars in four different locations. We want to edit the command bar of the main form.
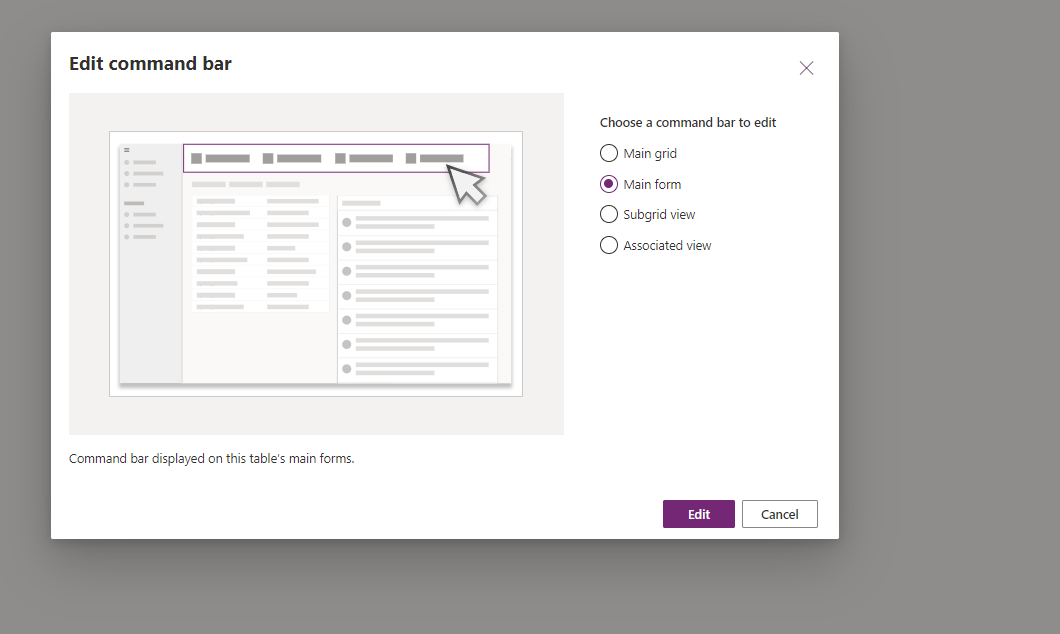
The command bar designer opens. Here’s what we need to define:
- Add a new button (1)
- Name it (2)
- Select the appropriate icon (3)
- The function is defined as the execution of a Power Fx formula (4). Another option is to run JavaScript.
- Open the formula editor (5)
- Define what happens when the button is pressed (6)
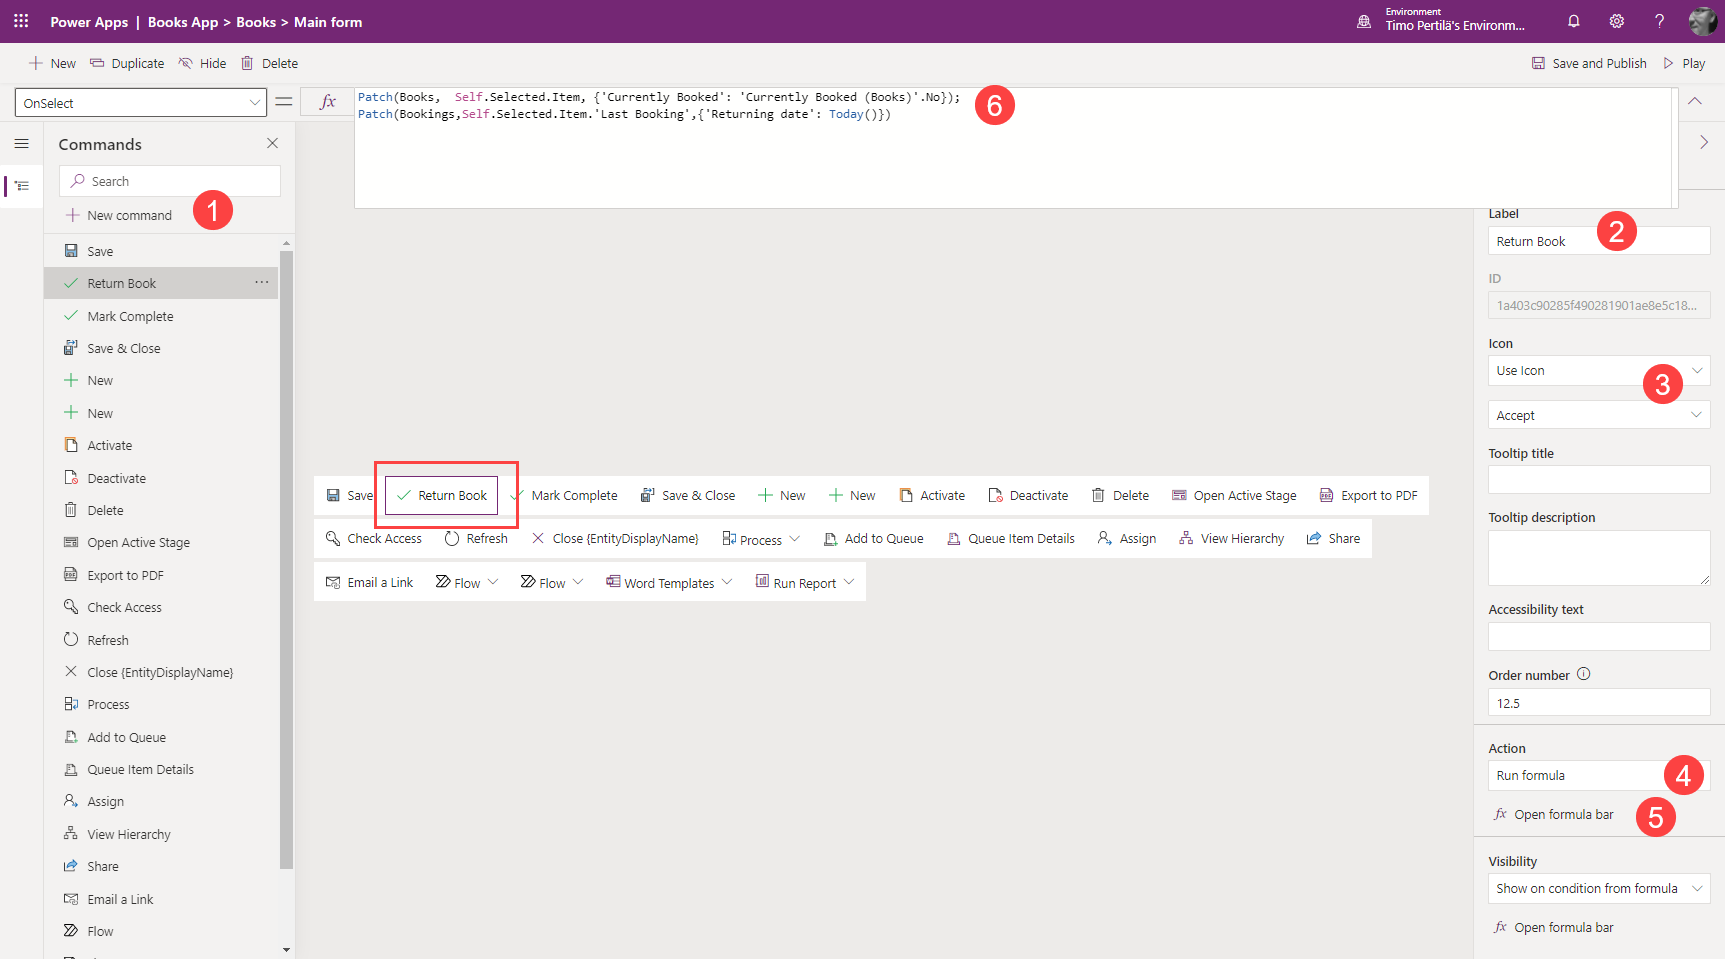
The formula is familiar Power Fx to canvas makers. Piece of cake! As long as you remember that the form record is referenced by the command Self.Selected.Item.
Patch(Books, Self.Selected.Item, {'Currently Booked': 'Currently Booked (Books)'.No});
Patch(Bookings,Self.Selected.Item.'Last Booking',{'Returning date': Today()})
Of course, the book can only be returned if it is currently booked. Let’s define the visibility of the button depending on the formula ( Visibility = Show on condition from formula, 1).
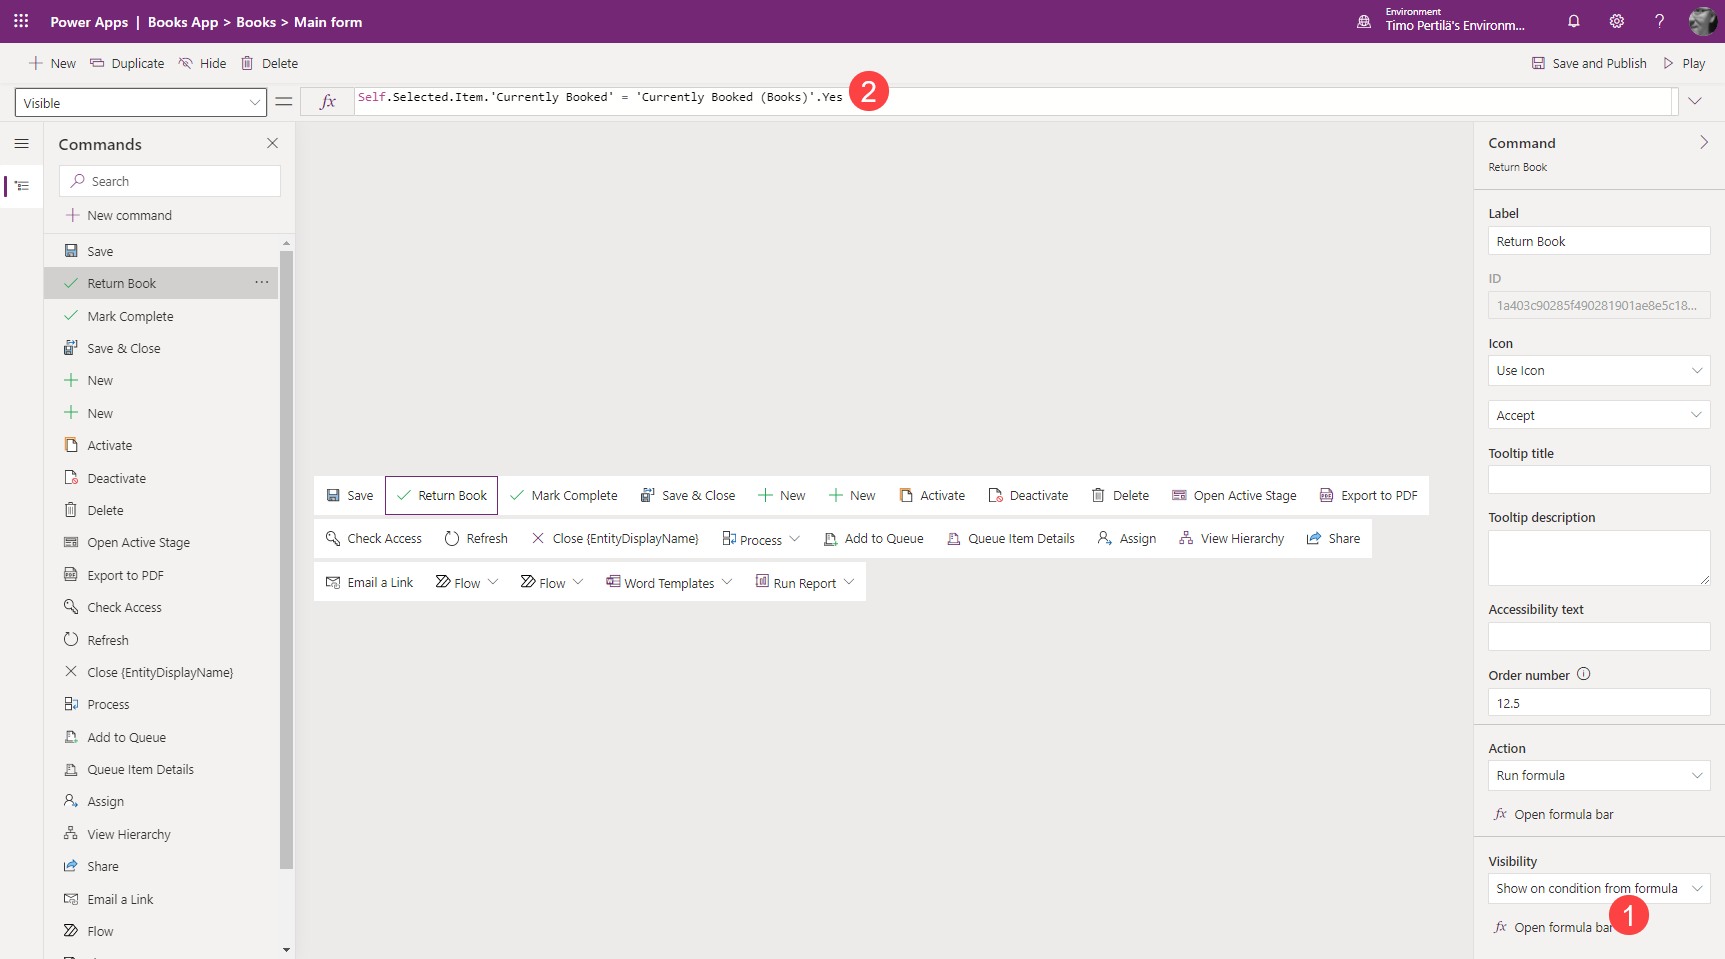
The following formula (2) is used.
Self.Selected.Item.'Currently Booked' = 'Currently Booked (Books)'.YesNow the button only appears when the book is currently booked.
And there it is!
Navigation from model-driven to canvas
It is also possible to open a custom page from the model-driven command line. There are three ways to do this.
Open the page as the main page

Open the page as a modal dialog

Open the page as a so-called side dialog

In practice, the navigation is implemented (at least for now) with JavaScript.
Summary
Here you can see the full solution in action:
Custom pages will change what we as low-code application makers can achieve with Power Apps. Now it’s possible to truly combine the best of canvas and model-driven features within one app.
This model still has its technical shortcomings. However, I don’t think those are going to be obstacles for implementation. The real slowdown will be turning the heads of solution designers to this new model, to identify the use cases for which this approach is better suited than the traditional way of either/or.
Custom pages are a brand new concept that pushes all the makers to “think different”. Many of the canvas app makers out there come from the world of Microsoft 365 services. Whereas the makers of model-driven apps, on the other hand, often have a Dynamics 365 background.
As the Power Apps client application capabilities are coming together, these two audiences should also do the same.
Great post to show these new possibilities! It will indeed take some time to get designers to see both sides of the spectrum, mee included. Learn by doing!!
thanks about this information
Thank you for sharing the steps very clear.
Are custom pages compatible with the mobile version as mine works fine on the web but I get a sign in failure error on the app on the phone.
They should be, but with iOS you have to enable “Allow cross site tracking” on Safari settings