Setting up Power Platform vNet Integration

Last updated: February 20, 2026
Overview
Integrating Power Platform environments with Azure Virtual Networks can appear daunting. Few people are experts on both Azure and the Power Platform, and even if you are, some aspects of the process are probably new to you. This guide provides step-by-step instructions for setting up Power Platform vNet integration, along with timely warnings about potential pitfalls.
Power Platform Virtual Network Integration Explained
Power Platform Virtual Network integration provides a more secure way for Power Platform resources—such as Canvas apps, model-driven apps, and cloud flows—to communicate with Azure services, including key vaults and SQL databases. It allows approved Power Platform environments to inject data into paired Azure networks through designated subnets. These subnets use service endpoints or private endpoints to communicate with Azure resources. As a result, your Power Platform resources cease contacting your Azure resources as an external service. Instead, they send communications from within your Azure virtual network, making it easier to verify their authenticity and keeping bad actors from accessing your data.
This integration may seem unnecessary at first glance. After all, when two Microsoft services, such as Azure and the Power Platform, communicate, the connection is already routed over the Microsoft backbone rather than the public internet. Why does this still matter? The full answer involves key security principles: defense in depth, minimizing attack surfaces, zero trust, and presuming breach. In practice, however, it comes down to three goals. You want:
- All your Azure resources to be protected by firewalls
- Your trusted resources to be able to get through those firewalls
- Nothing else to get through.
Turning off your firewall to allow Power Platform resources through would create a massive attack surface, exposing your Azure resources to the public internet. Without vNet integration, letting your Power Platform resources clear the firewalls would require safelisting the Power Platform region. Doing so would also allow bad actors, both inside and outside your organization, to access your resources, provided they use Power Platform in the same region. That’s better than having no firewall, but it’s still a risk.
With Power Platform Virtual Network integration, you can designate secure, managed environments within your tenant that can access specific Azure resources, giving you complete control over the connections. Your network stays safe. Nothing will get through except what you allow.
What does that mean in practice?
Once you integrate your environment into Azure, all supported connections will send all communications targeting Azure resources through the designated subnets. Note that this is only supported connections: other Power Platform resources will behave normally. As of writing this, Microsoft supports the following connectors, most of which are specific to Azure:

Astute observers will notice that the HTTP request action is not supported. If you need to make an HTTP request, use the HTTP with Microsoft Entra ID (preauthorized) connector (for supported services) or build a custom connector for your request. Custom connectors will use the vNet integration only when the target is in Azure; otherwise, they will behave as they would without it.
This latter distinction is important if you want to use NAT gateways to direct your traffic. While Microsoft documentation claims that NAT gateways over the affected subnet will direct traffic through a controlled IP address, this is misleading. In practice, custom connectors targeting the public internet will not use the integration and thus will not pass through your NAT gateway or use your custom outbound IP address. If you want your Power Platform connections to use a controlled outbound IP, see this post.
Once your connectors begin communicating from within an Azure subnet, they will be subject to the full range of network security regulations applicable to that subnet/vNet. For example, if your Azure environment has a network security group that restricts outbound traffic, those restrictions will also apply to the supported Power Platform connections.
This allows you to have greater control over your Power Platform connections in Azure, enabling enhanced oversight and security. However, this feature only applies to Power Platform connections targeting Azure resources. For better or worse, your other Power Platform connections will not be subject to these restrictions or monitoring capabilities.
Prerequisites:
There are several things to verify before you begin. The Microsoft documentation lists several prerequisites for vNet integration, but some deserve further explanation.
Review your connections:
The first recommendation in the docs is to review your connections. Specifically:
Review your apps, flows, and plug-in code to ensure they connect over your virtual network—they shouldn’t call endpoints over the public internet. If your components need to connect to public endpoints, ensure your firewall or network configuration allows such calls.
Note that most connections do not allow you to configure in this way. That’s okay. If you’re using private endpoints, as Microsoft recommends (and I do, too), it’s enough to configure your private DNS zone to direct traffic to the private endpoint for your subnet. Some plugins or other full-code components, however, may require special configuration if they don’t resolve your resources by URI.
Prepare your tenant:
The second point, “Prepare your tenant,” may seem straightforward, but depending on your organization’s policies, it may be the most time-consuming. Microsoft’s recommendation to “Have an Azure subscription with permissions to create a virtual network, subnet, and the enterprise policy resources” may entail negotiating a range of Azure policies and initiatives. You should check your policies and initiatives before you begin. I’ll discuss some of these steps here, but there may be others, depending on your settings. In particular, the ‘limited locations’ policy should be reviewed, if applicable, as the default settings will always conflict with the enterprise policy deployment.
Check your policies before starting!
In addition to creating those resources, you may need the rights to deploy other resources if policy requirements compel you to, for example, deploy network security groups or route tables along with your subnets, so ensure you have the necessary access. Also, ensure no policy blocks necessary resources by type or other factors. Often, if you have access, the fastest way to confirm this is to try deploying resources and see if they fail. If a policy blocks them, you should see an error message indicating which policy is responsible. You can also ask someone knowledgeable about your organization’s policies, who can usually confirm any conflicts.
However, one thing to check explicitly is your limited locations policy. Your subnets must be located in paired regions, and the enterprise policy will be deployed at the Power Platform region (Azure geography) level, not at the Azure region level. If your organization has policy restrictions on where to place resources, you must take these into account.
Consult the official documentation to determine which Power Platform region (again, note that Power Platform regions are equivalent to Azure geographies) and Azure region pair to use. You must use the Power Platform region for your environment and enterprise policy corresponding to the paired Azure regions in the chart. There can be no mixing and matching.
The Unpaired Region Exception
In late 2024 to early 2025, a problem occurred in which single-region geographies were unusable via Power Platform vNet integration. As of Autumn 2025, however, multiple people have contacted me on different channels to inform me that the issue appears to be resolved. You should now be able to deploy virtual network integration in single-region geographies.
Adjusting Your Locations Policy
If your organization has a limited locations policy, your Power Platform region/Azure geography (again, the same thing) is likely not covered, blocking your enterprise policy deployment. Worse, your geography won’t be available as a policy parameter.
To resolve this, your Azure policy administrator must manually edit the definition to allow your geography. Follow the same structure that is probably already used for “Global” deployments in your policy. For example, the default structure of a location policy policyRule looks like this:

To enable deployment to “Europe,” for example, you would need to (at a minimum) change it to this:

For added security, your policy administrator may wish to restrict this change to microsoft.powerplatform/enterprisepolicies type resources. This would ensure that only Power Platform enterprise policies can use the new deployment location. Whether or not this is necessary depends on your organization’s security standards, but it is rarely a bad idea.
Final Preparations
- On the Power Platform side, ensure your environments are managed and located in the expected region.
- Install the PowerShell modules
- Ensure you have Power Platform system administrator access to the managed environments.
Installing the enterprise policy used to be performed with PowerShell scripts. These scripts are still available, but they have moved to a new location. You can now find the GitHub repository for the scripts here. However, Microsoft now offers PowerShell modules, available for both Windows PowerShell and PowerShell Core. The modules perform the same actions as the scripts but are generally more user-friendly, so we’ll focus on that method here. Note that Microsoft also offers instructions for manual installation.
Setting up in Azure:
Once you’ve established your prerequisites, it’s time to start deploying Azure resources. This blog will focus on requirements specific to the Power Platform integration, but some special details here are worth noting. At this stage, you must:
- Create two virtual networks in paired regions.
- Assign each virtual network a subnet exclusively dedicated to the Power Platform.
- Deploy the Azure resource you’re connecting to (if you have not already).
If you don’t know how to deploy a virtual network in Azure, you can find more information about it here. You may also wish to set up a private endpoint for resources that support them. If your private-endpoint resource is in a different geography, please consult Microsoft’s guides on virtual network peering. Either way, for private endpoints in multi-region geographies, both your primary and failover subnets need to be able to access a private endpoint associated with that resource. This can be separate private endpoints in each virtual network separately or a single private DNS zone that covers multiple peered virtual networks.
For minimizing your attack surface, I recommend the latter. Deploy your failover subnet in a virtual network dedicated solely to that purpose, and peer it to the network where your private endpoint is. If that network is not your primary subnet’s, peer the primary subnet’s virtual network as well. Use a private DNS zone for your private endpoint that is linked to both virtual networks.
If deploying to a single-region geography, do the same but without the failover subnet. Either way, for your integration to access a private endpoint:
- Every Power Platform subnet must have an associated private DNS zone.
- That private DNS zone must have an A record with the correct URI of the resource and the private endpoint’s IP address.
- The private endpoint must be deployed to a subnet accessible to the Power Platform’s subnet (in the same virtual network or a peered one).
- The endpoint must also be deployed to the resource and approved.
For service endpoint connections to public endpoints, no peering is required, and the target resources do not need to share a network or even a region with the integrated subnets. Instead:
- The target resource must be in the same tenant as the subnets (it can cross regions and subscriptions as needed).
- The identity managing the firewall rules for the target resource must have read access to the subnets in order to allow them.
Some special exceptions exist:
- Unlike other resources, Azure SQL Databases require that the subnets be in the same region to allow service endpoints to access them through the firewall. As such, Azure SQL Databases cannot be used with the public endpoint in multi-region geographies. For these scenarios, you must use a private endpoint instead.
- Snowflake or similar resources may not allow safelisting via service endpoints at all. In such cases, a private endpoint deployment is mandatory.
No configuration requires sharing a region or geography with the target resources, although some may require peering and private endpoint deployments.
Virtual Networks and Subnets
We’ll discuss the network requirements for the virtual network and subnets here. Be advised that while you can deploy these resources in advance, you can also deploy them automatically later via the PowerShell commands.
Key Requirements:
- Two virtual networks (vNets) – one in each paired region. Just one for a single-region geography.
- Two subnets – one in each virtual network. Again, just one for a single-region geography.
- A managed Power Platform Environment that matches the geography of the region/paired regions.
In theory, your primary subnet handles most of your traffic. The secondary acts as a failover, directing traffic when the first is unavailable. You cannot control when the failover occurs. However, Microsoft documentation no longer refers to the networks as “primary” and “failover,” and some users have reported that their “failover” network is handling the majority of traffic. This suggests that Microsoft may not actually treat these as hierarchical on the back end. These instructions assume that the primary/secondary distinction is meaningful regardless, but take that with a measure of skepticism.
As always, ensure that both networks fit any data residency or similar requirements you may have.
To reduce latency, ensure that Azure resources and your subnets are in close proximity.
- If your resources (such as a key vault or database) are in a region that does not support Power Platform virtual network integration, choose the nearest. For example, if the resource is in centralus, put the networks in eastus and westus and the environment/policy in the United States.
- If you have an existing virtual network in one of the regions that already contains some of your Azure resources, you can add your primary subnet there instead of creating a new virtual network.
The subnets need to be dedicated to the Power Platform, but the rest of the virtual networks do not. This means that no other resources can be deployed to the subnet. Multiple environments can share a pair of subnets and a policy, but each enterprise policy should be assigned to a different set of subnets. As your architecture permits, feel free to add either subnet to an existing virtual net with space that meets the requirements, but be advised that isolating your resources from others they do not need access to is good design.
Subnet Sizing and Configuration
Microsoft’s original guidelines recommended allocating a /24 CIDR block per subnet, providing 251 usable IP addresses. However, the recommendations have since changed. It is now recommended to reserve 5 IP addresses per subnet, with an additional 25–30 addresses per production environment and 6–10 per non-production environment. If you’re integrating just a single production environment, a /26 block offers 64 total addresses—5 reserved, leaving 59 available. To conserve IP space, you can opt for a /27 block at the lowest, which provides 32 addresses—5 reserved and 27 usable for production. This is slightly less conservative than the 30-per-environment estimate but should still be workable.
Resources and Connectivity
If you haven’t already, you must deploy the Azure resources you connect to and ensure the subnets can access them.
For Private Endpoints:
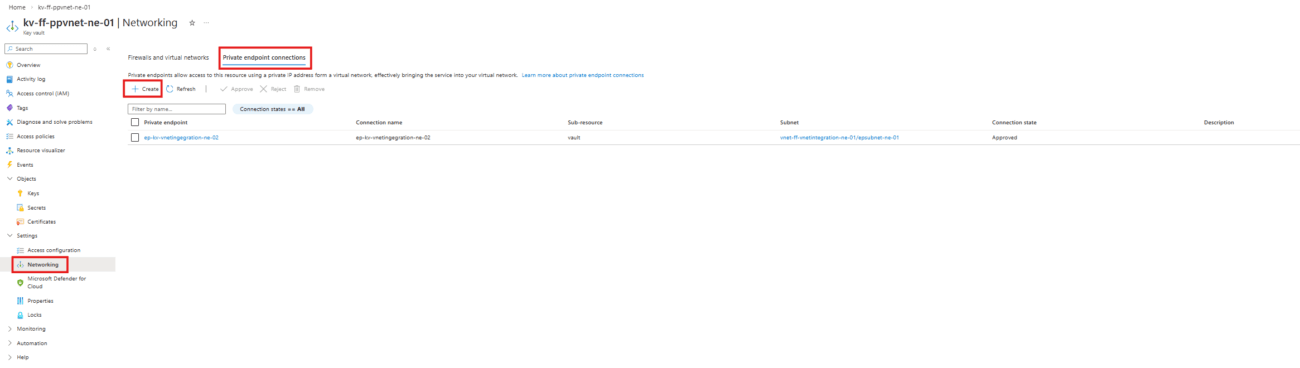
Add a private endpoint to the resource and ensure both subnets can access that endpoint, setting up network peering as necessary (for whichever subnet(s) aren’t in the same virtual network as the endpoint). Ensure the private DNS zones are configured with A records for each endpoint. There are several way sto do this. For example, from an Azure Key Vault, you can deploy a private endpoint from the networking page, as shown here:
Doing so will take you to the resource deployment page, where you’ll configure our private endpoint as follows:
- On the basics tab, choose your resource group, name your endpoint, and pick the region matching the network where you wish to deploy it.
- On the resource tab, choose the resource type (In this case, Microsoft.KeyVaults/vaults), the name of your resource, and the subtype (vault, in this case).
- On the networking tab, choose your virtual network and subnet. This cannot be one of the subnets dedicated to the power platform integration.
- On the DNS tab, choose Yes under Integrate with private DNS zone to automatically create the A record for the resource in your private DNS zone. If you choose no, you’ll have to create your A record manually (and possibly deploy your own Private DNS zone, if you haven’t already).
- On the “Review + Create” tab, select Create to deploy your resource.
- Lastly, ensure that your private endpoint is approved on the private endpoint connections page for the resource.
For Public Endpoints:
If your Power Platform resources connect via public endpoints, add the subnets to the resource’s networking page, as shown below. The example uses a key vault for demonstration, but the interface is similar across most Azure resources.

- Select Allow public access from specific virtual networks and IP addresses.
- Click +Add a virtual network.
- In the dropdown menu, select Add existing virtual networks.
- Provide the details of your virtual networks and subnets in the blade that appears on the right.

Your Azure resources are now ready.
Run the Scripts
Here’s where the real magic happens! These instructions have been updated to use the latest PowerShell modules. If you prefer to work with the shell scripts directly, you can still find them here, and if you need guidance on how to run a shell script, click here. If you prefer manual setup with resource templates, see Microsoft’s guidelines here.
Before starting, ensure PowerShell is installed. PowerShell Core and Windows PowerShell are both supported for this.
I’ll walk you through this process step by step, but general instructions are also available on Microsoft Learn.
During this process, the system may prompt you to log in or confirm that you want to run certain actions. This is expected behavior. Go ahead and give permission when prompted. When asked to log in, use the account with Azure permissions discussed in the prerequisites.
Module Installation
If you haven’t, you should start by installing the necessary modules.
First, run
Install-Module Microsoft.PowerPlatform.EnterprisePolicies
Import-Module Microsoft.PowerPlatform.EnterprisePolicies
These will install the necessary modules to continue this process, along with any prerequisite modules you lack.
Configure your virtual network and subnet for delegation to Power Platform
Next, you need to set up your virtual networks and subnets to use Power Platform enterprise policy delegation.
Existing Subnet
If you have previously created a subnet, begin with the following command, replacing the key values with your own information.
New-VnetForSubnetDelegation -SubscriptionId "00000000-0000-0000-0000-000000000000" -VirtualNetworkName "myVnet" -SubnetName "mySubnet"Supply your existing subscription id, virtual network name, and subnet name. If you don’t know your subscription Id, you can find it on the overview page of your subscription in the Azure portal, as shown below. A button is available to copy it to your clipboard.

The virtual network name appears on the virtual network’s overview page, and the subnet name appears on the subnet listing. Each can also be located in the JSON view linked from the virtual network’s overview page. Enter each exactly as it appears in the portal.
For multi-region deployments, you must repeat this process for both the primary and failover subnets. This step can also be skipped by manually setting the delegation for each subnet to Microsoft.PowerPlatform/enterprisePolicies in the Azure portal.
New Subnet
Instead of linking to an existing virtual network and subnet, you can also create one at this stage. To do so, use the following command:
New-VnetForSubnetDelegation -SubscriptionId "00000000-0000-0000-0000-000000000000" -VirtualNetworkName "myVnet" -SubnetName "mySubnet" -ResourceGroupName "myResourceGroup" -CreateVirtualNetwork -AddressPrefix "10.0.0.0/16" -SubnetPrefix "10.0.1.0/24" -Region "westus"Use your existing subscription id, as in the previous example. For any arguments where you specify an existing resource (such as a resource group or virtual network), the existing resource will be used. For any resource where you provide a new name, a resource with that name will be created automatically. You can run this command multiple times to create your subnets. What you name your resources is a matter of your own conventions.
You’ll see a message like this to let you know you succeeded:

If creating a new subnet in an existing virtual network, you’ll see:

Create the Enterprise Policy
Next, you need to create the enterprise policy itself. Note that this can also be done with an ARM template.
When creating a policy for a single-region geography, use this command:
New-SubnetInjectionEnterprisePolicy -SubscriptionId "00000000-0000-0000-0000-000000000000" -ResourceGroupName "myResourceGroup" -PolicyName "myPolicy" -PolicyLocation "unitedstates" -VirtualNetworkId "/subscriptions/12345678-1234-1234-1234-123456789012/resourceGroups/myResourceGroup/providers/Microsoft.Network/virtualNetworks/myVnet" -SubnetName "default"For a multi-region geography, use this command:
New-SubnetInjectionEnterprisePolicy -SubscriptionId "00000000-0000-0000-0000-000000000000" -ResourceGroupName "myResourceGroup" -PolicyName "myPolicy" -PolicyLocation "unitedstates" -VirtualNetworkId "/subscriptions/12345678-1234-1234-1234-123456789012/resourceGroups/myResourceGroup/providers/Microsoft.Network/virtualNetworks/myVnet" -SubnetName "default" -VirtualNetworkId2 "/subscriptions/12345678-1234-1234-1234-123456789012/resourceGroups/myResourceGroup/providers/Microsoft.Network/virtualNetworks/myVnet" -SubnetName2 "default"You’ll need to supply the following parameters:
- SubscriptionId: Copy the subscription id from the subscription’s overview stage, exactly as you did in the previous step.
- ResourceGroupName: Copy the resource group name from the Azure portal or use the name you used in the previous command. This should be whatever resource group you want to assign the policy to. I recommend using the same group as your virtual networks to keep your Power Platform virtual network integration resources neatly organized.
- PolicyName: This is the new name for your policy. Choose whatever name you want. Ideally, this should be descriptive and adhere to your organization’s naming conventions.
- PolicyLocation: Use the name of the Azure geography/Power Platform region that corresponds to the paired regions of your subnets and the Power Platform environment(s) you wish to integrate. The name should be in lowercase. Omit any spaces, i.e., “unitedstates” or “southafrica”
- VirtualNetworkId: This is the complete ARM resource ID for the primary virtual network, NOT the ID on the virtual network’s overview page. Use the format below, replacing <Subscription ID> and <Resource Group Name> with the virtual network’s subscription ID and resource group name as you entered previously. Replace <vnet name> with the name of your virtual network. This ID can also be copied from the Azure portal by clicking JSON View in the upper-right corner of the virtual network’s overview page, which displays the ID directly above the JSON contents for easy copying.
/subscriptions/<Subscription ID>/resourceGroups/<Resource Group Name>/providers/Microsoft.Network/virtualNetworks/<vnet name>
- SubnetName: Provide the name of the designated subnet you created in your first virtual network. Enter it exactly as it appears in the Azure portal (without any fancy formatting).
- VirtualNetworkId2: Follow the instructions above for the primary virtual network ID, but, instead, substitute the information from your second virtual network. If deploying to a single-region geography, you should omit this.
- SubnetName2: Provide the name of the designated subnet you created in your second virtual network. Enter it exactly as it appears in the Azure portal (without any fancy formatting). If deploying to a single-region geography, you should omit this.
After entering this command, you’ll be prompted to add your tenant ID. You can find this in the tenant properties page in the Azure portal. After your command succeeds, you’ll see an output like this (but without the ResourceId redacted):

Remember to save your policy’s name and/or ResourceId. You’ll need one of those in the next step, depending on which option you choose.
Add Subnet Injection to Your Environment
And finally, it’s time to add subnet injection to your environment. For this, you have two options: the GUI or the PowerShell command.
Using the GUI
A GUI is now available for performing this step. You can find it in the Power Platform Admin Center under Security -> Data and Privacy -> Azure Virtual Network Policies. If you wish to try it, you’ll see something like this:
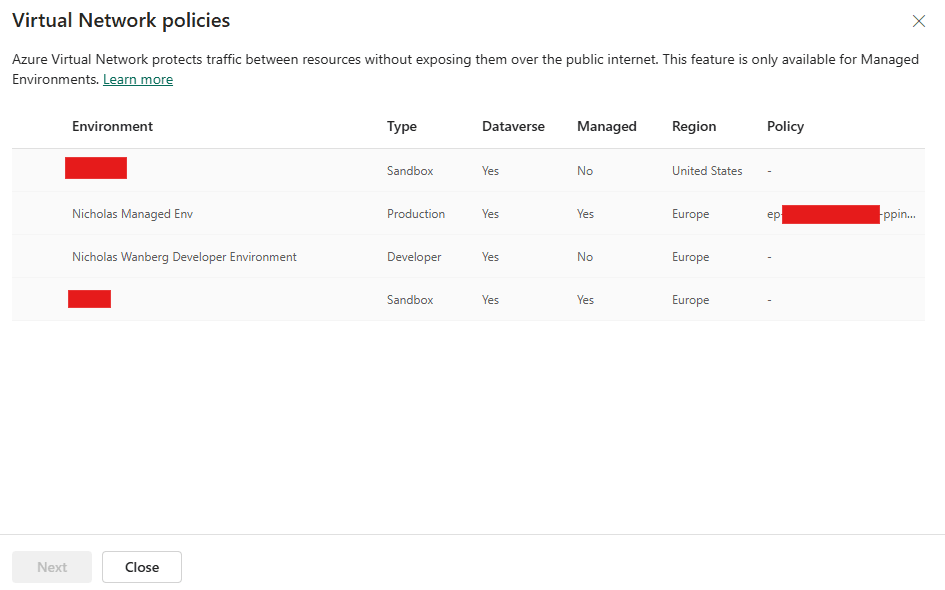
If the environment you are looking for does not appear, ensure you have admin rights and are a member of the security group. There may be a delay after the assignment of the rights before it becomes visible. Selecting an unmanaged environment and clicking Next opens a dialog box prompting you to make the environment managed. Doing the same for a managed environment will take you to a page like this:
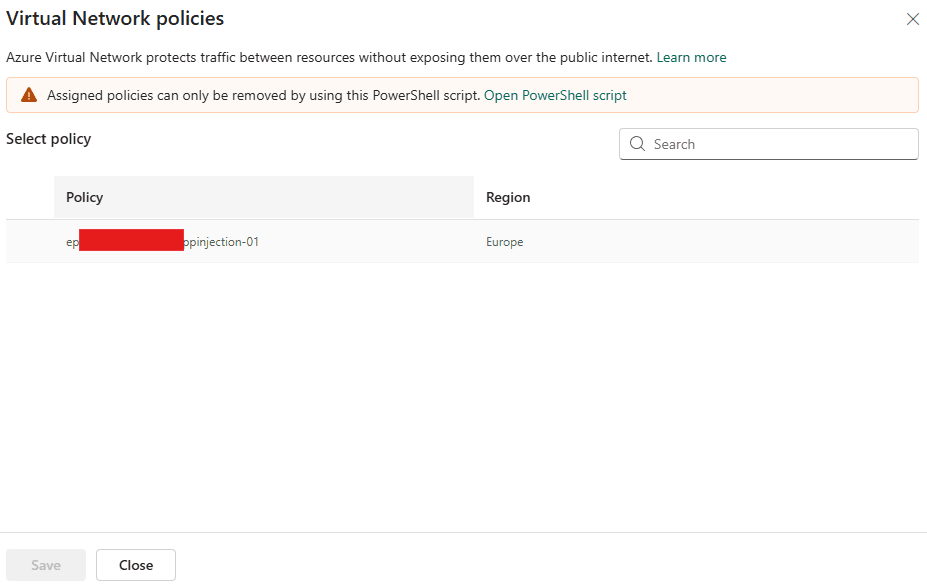
To assign a policy, select one from the list and click Save. If no policies appear, ensure that you have read access to the policy in question. If it was recently deployed, my experience suggests that you may sometimes have to wait up to an hour before it appears. This time limitation does not seem to apply to the PowerShell commands.
Using PowerShell
To assign the policy to your environment in PowerShell,
Run:
Enable-SubnetInjection -EnvironmentId "00000000-0000-0000-0000-000000000000" -PolicyArmId "/subscriptions/12345678-1234-1234-1234-123456789012/resourceGroups/myResourceGroup/providers/Microsoft.PowerPlatform/enterprisePolicies/myPolicy"You’ll need to provide the following parameters:
- EnvironmentId: The environment ID appears on the environment’s page in the Power Platform admin center.
- PolicyArmId: Your policy’s ARM ID should use the format below. Replace <Subscription ID> and <Resource Group Name> precisely as you did with the virtual network ARM ID. If the policy is not in the same resource group as your virtual networks, use its resource group name instead. In place of <Policy Name>, use the name you assigned to your enterprise policy when running the previous script. You can also just copy this directly from the output when you created the policy with the earlier command.
/subscriptions/<Subscription ID>/resourceGroups/<Resource Group Name>/providers/Microsoft.PowerPlatform/enterprisePolicies/<Policy Name>
For this step, the account you use must also have admin permissions in the Power Platform environment. If you need a different account for this, use the -ForceAuth parameter in the command. It will then prompt you to log in again, allowing you to choose a different account.
Once this completes, your Power Platform environment should be integrated with your Azure virtual networks.
Validation and Testing
You may find it beneficial to grant read access for enterprise policies to the Power Platform administrator role. Doing so is optional, but it will allow your Power Platform administrators to view the enterprise policies applied to their environments, including the one you have just created. It will also save time by eliminating the need to manually grant read access or admin access to those who assign policies to your environments in the future.
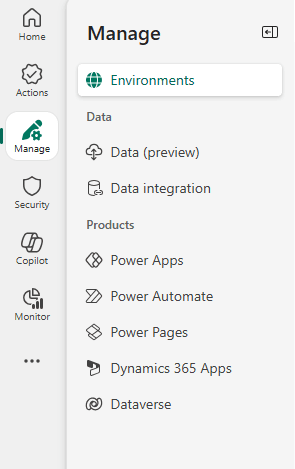
Even without all that, you can confirm the process was successful in two ways. The first is by using the GUI mentioned above. However, as noted, it may take some time before the GUI shows the assignment. For a faster approach, you can confirm by checking your environment’s history. In the Power Platform Admin Center, select Manage on the left blade, followed by Environments:
Select the environment, then scroll to the bottom of the page. If your enterprise policy was the most recent action, you’ll see it in the Recent operations box like so:

If not, click Full history in the upper right of that box. This will take you to a timeline where the enterprise policy application should appear. Please note that there is a known issue where the timeline entry may appear in a random language, rather than matching your environment’s settings. If you see an unfamiliar entry in a language you don’t speak, that might be it. An online translator should help you confirm that it’s your new policy. If the policy doesn’t appear, your integration likely failed, and you’ll need to review your setup and identify the problem.
Your Power Platform resources should now be able to connect to your Azure resources. If you find that they cannot, confirm your Azure security settings at the network and resource levels, and ensure you have the necessary permissions to access those resources. Note that you may need to re-save your custom connectors before they begin using the new integration. Likewise, note that service endpoints are automatically added to your subnets when you safelist them on an Azure resource. If this process fails for any reason (which can happen, but is rare), you may need to add them manually.
I find it easiest and with clearer feedback to simply test the connection with Power Platform tools, but if you have problems, Microsoft provides debugging tools.
Removing vNet Integration
If you make a mistake or need to change your setup, you can remove your virtual network integration. This can only be done via PowerShell. To change the links on your Azure resources, delete and recreate the enterprise policy. Removing the policy can be done manually or with the RemoveSubnetInjectionEnterprisePolicy.ps1 script in the SubnetInjection section of the repository (the same place you found most of the earlier scripts). To remove the integration from an environment without deleting and recreating the environment, use the RevertSubnetInjection.ps1 script located in the same directory. This will remove the effects of the integration from the environment, leaving it ready to be integrated into new subnets if desired.
Summary and key takeaways:
Integrating your Power Platform environments with Azure Virtual Networks strengthens security, increases your control over data, and ensures reliable and secure communication between systems.
In this blog post, I explained how to perform the integration, beginning with creating a virtual network and subnet and configuring Azure resources for secure access by your systems. I took you through the steps to run the commands to perform the integration. I also explained the prerequisites and identified possible challenges you may encounter. I aimed to keep the content comprehensive and accessible, but if you have questions or encounter any issues, feel free to comment below!
Thanks Nicholas
Can you please explain how you tested the environment with an example?
Did you create a flow to test the connectivity from Power Platform to Key Vault? Could you please explain this?
Additionally, can you try to test the private endpoint connectivity with Azure Storage (private endpoint enabled and public access disabled)?
Yes, I used a cloud flow with key vault actions to test the key vault connectivity.
Key vault with public access: all actions succeed
Key vault allowed only from selected subnets: all actions succeed
Key vault with a private endpoint enabled and public access disabled: All actions fail
Connecting to an Azure storage account works the same way. Using a list blobs action in a cloud flow, it will succeed through a firewall that limits access to selected subnets but will fail if you try to use a private endpoint, even when that private endpoint is on the same virtual network. The private endpoint (with public access disabled) will likely help only if you’re using custom code or something else configurable to use the local IP of the endpoint.
The main difference if you want to set up the connectivity with a storage account is that settings are under different sub-menus in the Azure portal. You want to go to Security + Networking -> Networking -> Manage -> Enable -> Enable from Selected Networks and then select your Power Platform subnets.
What are the key benefits of integrating Power Platform with a Virtual Network (VNet)?
The main benefits are just network security. You have better defense in depth if you allow only the necessary components to access your resources and block all others. By using Power Platfrom Virtual Network integration, you can allow access exclusively to certain the resources in approved managed environments. The alternative would be to allow access to the whole internet or to the whole Power Platform, as environments or specific flows do not have unique ip addresses or other identifiers that a firewall could recognize.
Do you know whether the “custom API plugin” type is still supported in a power platform environment in which virtual network support has been enabled?
I haven’t had a chance to work with plugins personally yet through a vNet integration, but custom connectors and plugins are both listed as being supported. However, note that custom connectors only use the vNet integration if they’re connecting to a resource inside Azure and will otherwise operate as usual.
Great article thanks. I had some issues with the downloaded PS Scripts. had to run the modules individually for the enterprisepolicies.ps1 for example. Make sure the path at the top of the files are working too. In my case for the newSubnetInjection.ps1 for example I changed the path at the top which did not work initially to “. .\..\Common\EnvironmentEnterprisePolicyOperations.ps1” And all was finally good.
Thanks again!
You’re welcome, and I’m glad to hear you got it worked out! Good to know if any of us encounter the same problem.
Hi Nicholas, When you have tested with Key Vault with Private endpoint enabled and public is disabled. – All actions failed. Why does this option didn’t work? I
The short version is that when you set up Microsoft virtual network integration, it creates a service endpoint in the subnets, and that endpoint is what talks to your resources, so it channels the communication through a single point that way. When you use a private endpoint, you create an endpoint just for the resource (such as your key vault) in a subnet, and communications from within the network communicate with the resource that way, again through a single point.
However, these approaches appear to be exclusive. Your service endpoint cannot “speak through” your private endpoint, but the underlying architecture is similar: Instead of adding a private endpoint to the network for your resource, you approve your resource to use the service endpoint already in the network.
The Sweden/Singapore Exception
“Microsoft claims to have fixed this issue”
It’s not fixed and still impossible to do this with Singapore Power Platform env. I facing error 404 Not Found “EnterprisePolicyCallFailed” when trying to perform injection with enterprise policy that have just one vnet in southeastasia Azure region.
Thanks for testing this! I’ll update the post accordingly. It sounds like your attempt got slightly further than mine did, but there are still some issues to be resolved.
I don’t know about Singapore, but we’ve had policy working in Sweden a long time. We haven’t actually never used that as the migration has not started for other reasons.
It’s great news to hear some people are able to connect. I haven’t personally tested a single region geography in some time as the setup is considerable, but I’ll definitely make a note that it’s been working for some people.
What is the benefit of integrating Power Platform environments with Azure Virtual Networks?
The shortest answer I can give is that it helps you block resources you don’t want from accessing your Azure resources by making it possible to uniquely identify the Power Platform resources you do want so you can let only those through.
Did any one managed to configure the V-net Support for Sweden region? Successfully ?
I am able to configure enterprise policy and able to link it to Power platform environment in Sweden region. But then we are getting 403 error while accessing copilot studio from that Sweden region environment. That is very strange, Microsoft says your tenant is not multi geo but our tenant is in Sweden hence it should be possible to setup this.
That’s good to hear that you’ve been able to deploy a the enterprise policy. That’s typically where the blocker has been. I’m curious how you’re trying to access copilot studio, however. Copilot Studio isn’t usually considered an Azure resource in the same sense as a key vault or blob storage account. What are you trying to connect to it from and with what method?
Good morning!
There are so many resources out there regarding VNETs for power platform, and many of them are contradicting.
You cleanly laid it down, and I am appreciative of this!
I am a power platform developer, currently expanding into more technical areas, custom python scripting & hosting in AWS etc.
With this in mind, I am also trying to make our power platform as a solution to the company standardized and according to best practice.
One of the issues we are having, is we wish to whitelist HTTP requests from power platform in our Salesforce orgs. For this we need VNETs as I understand.
But, Salesforce is an non-Microsoft service, which means we would need some massive setups to get this working, as explained in your “Connecting to External (Non-Microsoft) Resources” article.
I wanted to ask, if it’s even worth pursuing this avenue? Would we have to rebuild / replace every salesforce action in our 300+ power automate flows?
TL;DR – we need to whitelist IPs from our PROD power platform environment in Salesforce (As well as TEST environment), can you guide me to the correct and “least expensive” implementation?
Thanks a million!
Howdy!
Thanks, I’m glad you appreciated the post!
For the implementation you described, you basically have three tiers that trade cost, effort, and security (ignoring the “no security at all” option).
I haven’t worked with it myself, but Salesforce advertises support for PrivateConnect, which uses AWS private link tech. You should be able to use that to peer your SalesForce AWS VPC with an Azure virtual network that you have integrated Power Platform into. Doing so would give you better security than an IP safelist. However, to use that, it would need to use custom connectors instead of the prebuilt Power Platform connectors for Salesforce, as the latter are not supported for vNet integration. Still, that would be your most secure option.
As you mentioned, the method I described in my other article would allow you to safelist just the sources from specific environments, but yes, that will also mean replacing the salesforce connectors with custom connectors that point to your function app or other relay service. It wouldn’t be as secure as the option above, but it would be very good, and it wouldn’t need you to figure out AWS private link and so on.
Finally, the least secure and stable option that is still better than just unsecure connections over the internet is to safelist the Power Platform IP range for your region. This might break later if the addresses change, and it will allow all environments in your region, not just the ones you want and not just yours. However, it is low-cost and relatively easy to maintain, and it is a big step above having no firewall at all. It also would work with the prebuilt connectors.
Hope that helps!